
For years, one of the benefits of using Bitmap (BMP) files inside of Adobe InDesign layouts is to apply spot colors to them inside of InDesign. If you place a 1-Bit Bitmap image into Adobe InDesign, you can use the swatches tool inside of Adobe InDesign instead of having to jump to another application such as Adobe Photoshop to modify it.

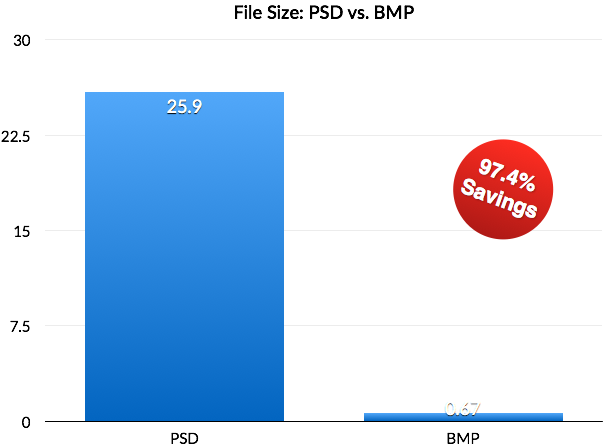
This is a great feature, except it has one big issue with it: it takes A LOT of space. For example, if you create a 1-bit Bitmap that is 12 x 12 inches at a resolution of 12,000 ppi, your file size will end taking up 25.9 MB! These larger files can cause several issues with your workflow:
- it takes up more space on your computer, your Zoom Server
- Can slow down InDesign when placing BMP files
- Generating previews of BMP files in Zoom
Solution: Adobe Photoshop
There is much better way to get the functionality that you want inside of InDesign while saving yourself a huge amount of space and create faster previews on the Zoom Preview Server. The solution is to use the Adobe Photoshop (PSD) format instead of BMP.
Adobe Photoshop (PSD) files are able to store 1-bit Bitmap inside of the file format. The main difference is that it can store in a lot less space without quality degradation. If you store the file as a PSD file it will only take 684 KB. That’s an entire 97% savings! Why such a difference the two different files? It has to do with the way that PSDs and Bitmaps store each individual pixels. Photoshop files are a newer format that are able to store the information in a smaller file. In combination with Zoom’s de-duplication technology, you save a huge amount on your 1-bit images inside your documents.
When you place your document into Adobe Photoshop, you will see that you will be able to use the Photoshop file in the same way you were able to use the BMP files.
Here is how to convert your BMP file to a PSD file:
- Open your BMP file in Adobe Photoshop.
- Go to File > Save As…
- Under Format, select Photoshop.
- Choose your destination of your file.
- Click Save.
Think you have some ways that you could optimize your workflow? Evolphin would love to help you. We provide services to help you find the gaps in your systems to help you save storage like described above and help you find other production processes in how to best use Zoom within your environment. For more information, contact Evolphin Sales.