

If you’re editing video files in Adobe Premiere Pro, you might have an idea of what type of camera files you might be working with. They will most likely be high resolution (frame size), high bit rate, and large file sizes.
In a perfect world, we all have storage space and a computer that can read these files, and play them back smoothly, without impediments, before the final export. For the rest of us, this is not the case. You’re going to need video proxy files.
Table of Contents
What is a Video Proxy?
A video proxy file is a compressed version of a higher resolution file. They’re used in place of the higher resolution file to ease the burden on your computer and improve system performance. With video proxy files, you can speed up the edit by preventing stutter in your edit software and also save on storage space.
If you’re going to try a proxy workflow, you need to consider a few things before beginning.
How much prep time do you have?
Most of us know our systems. If you’re receiving camera files the night before editing and you lack real-time, “lagless” playback capabilities, you’re going to have a bad time.
If you’re aware of what the camera files are going to be (i.e. resolution and bit rate) and you potentially foresee an issue, you’ll need to build in a day or two in your schedule to prepare proxy files.
How big are the camera files and where are they?
You’ll probably have the camera files delivered to you over the internet or via hard drives. These source files could potentially be several terabytes in size.
If you’re doing a proxy workflow, you also need to consider the amount of storage needed for the new files you’ll be transcoding for your edit.
How do you know which file is linked for your final export?
So now, your deadline is looming. Revisions are coming in, you’re perfecting the audio, color correcting to match different media, creating graphics, typing out titles and lower thirds, and the dog needs to go out. You have to export now!
A three-hour export is set up, ready to go, last checks, fire!
But that new clip you just dropped in the timeline a little while ago wasn’t linked correctly to the high-resolution file, and somehow, you didn’t catch it.
Uh-oh.
This is not an unusual challenge when using a proxy workflow.
A Media Asset Management system Like Evolphin Zoom doesn’t just manage your source media but also creates proxy files that can be used by multiple users from anywhere with internet access.
Below we’re going to look at how both programs can be used for a proxy workflow.
Proxy Preset Selection and Proxy Creation
What proxy codec should you use?
H.264 is very good and works on both MACs and PCs, but you have to get the bitrate just right.
Too low with a lot of action or contrast and you’ll get mushy images. Too high and you’ll get larger files and might run out of storage space.
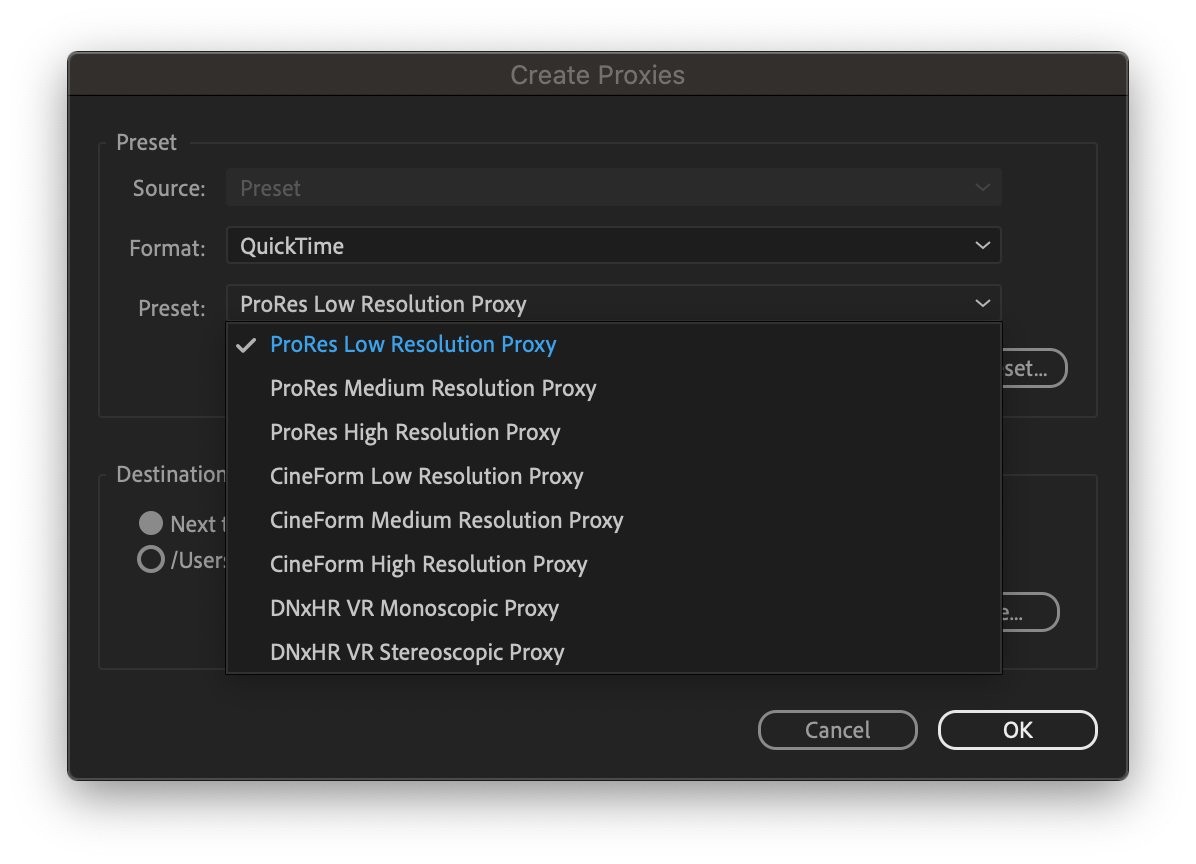
ProRes and DNxHD have different versions that can help you with your proxy creation. If you’re on a MAC, choosing a version of ProRes would be a good place to start. If you’re on a PC, DNxHD would work well.
Video Proxy Formats
Video proxy files come in many different flavors and choosing one can sometimes be daunting. You need to consider settings such as:
- Frame Size (1920×1080, 3840×2160, etc.)
- Bit Rate (mb/s)
- Bit Depth (8-bit, 10-bit or 12-bit)
- Chroma (4:2:0, 4:2:2, or 4:4:4)
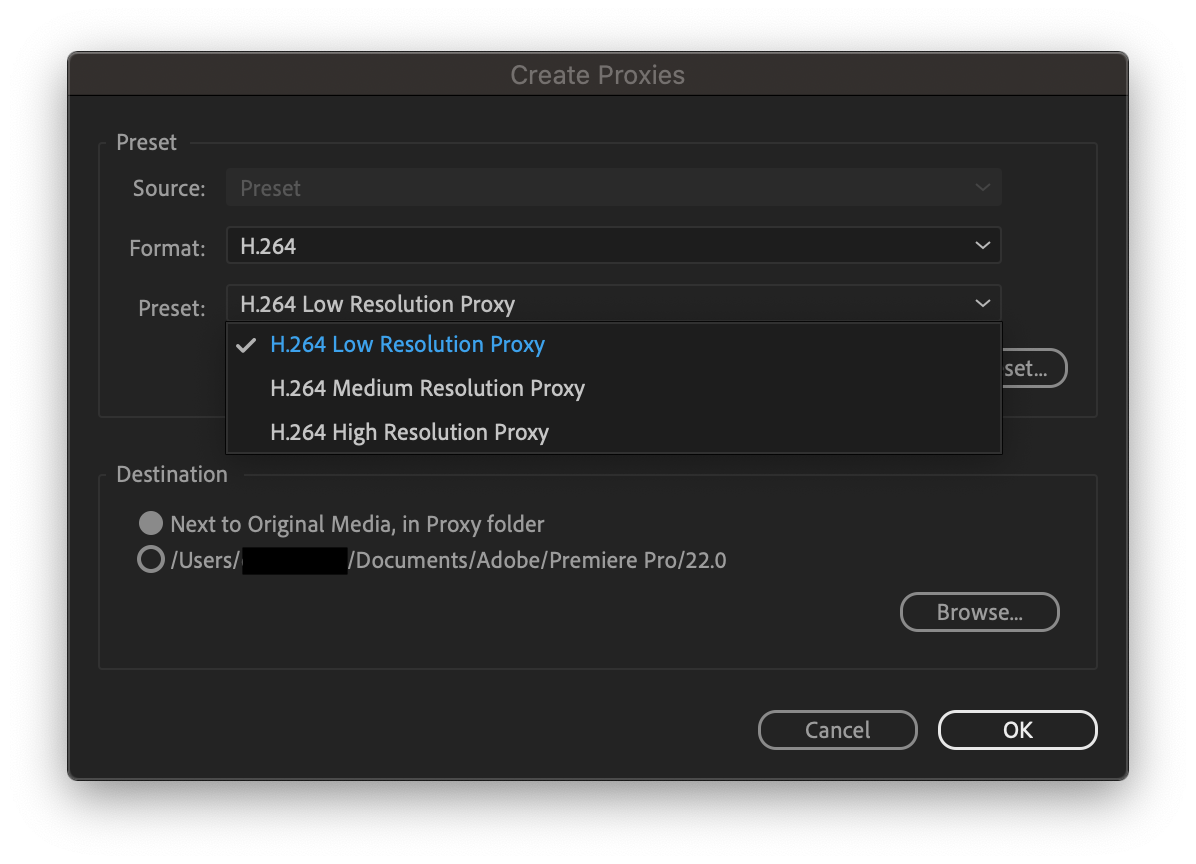
Adobe Premiere and Adobe’s file transcoding app Media Encoder come with a number of default presets and ingest settings to create proxies. These are H.264 and QuickTime files.
If you’re not using one of these, you’ll need to take the necessary steps in Premiere Pro and Adobe Media Encoder to create a proxy preset and trigger your transcodes.
How to Create a Custom Proxy Preset?
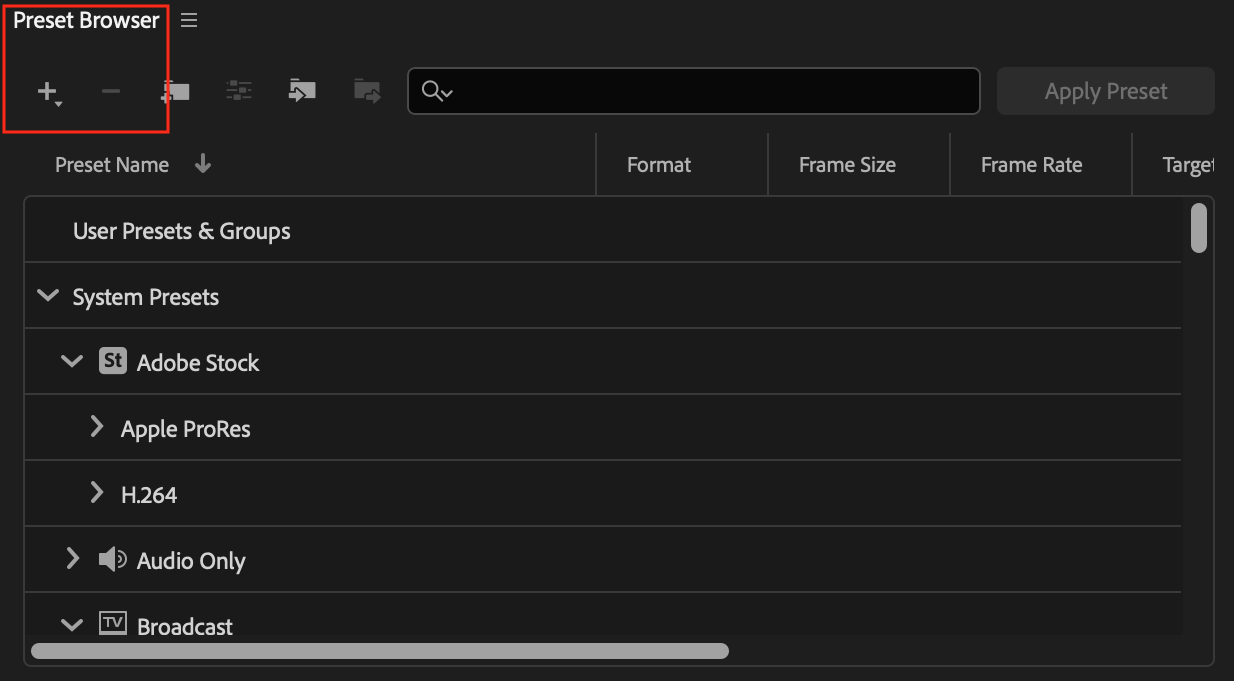
- Open Media Encoder and press the plus (+) icon in the preset window to create an encoding preset. An encoding preset is used primarily in Media Encoder. If you’re familiar with all the settings needed to create the preset, great, you can proceed.
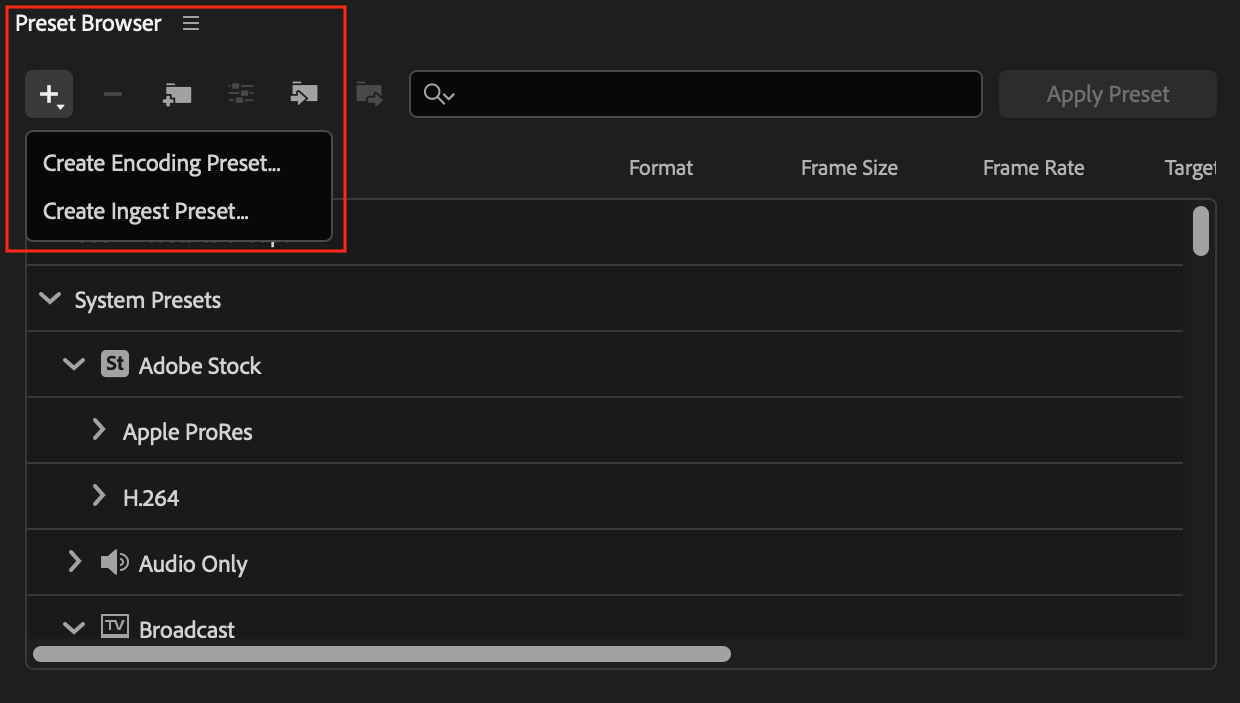
- Press the plus (+) icon AGAIN and create an ingest preset. You’ll need an ingest preset because that is what Premiere Pro uses to create proxy files. This is a preset that will USE the encoding preset created above. Save this preset as a .epr file on your computer.
- Once those are created, you can now switch over into Premiere Pro and right-click on your clips then Proxy -> Create Proxies.
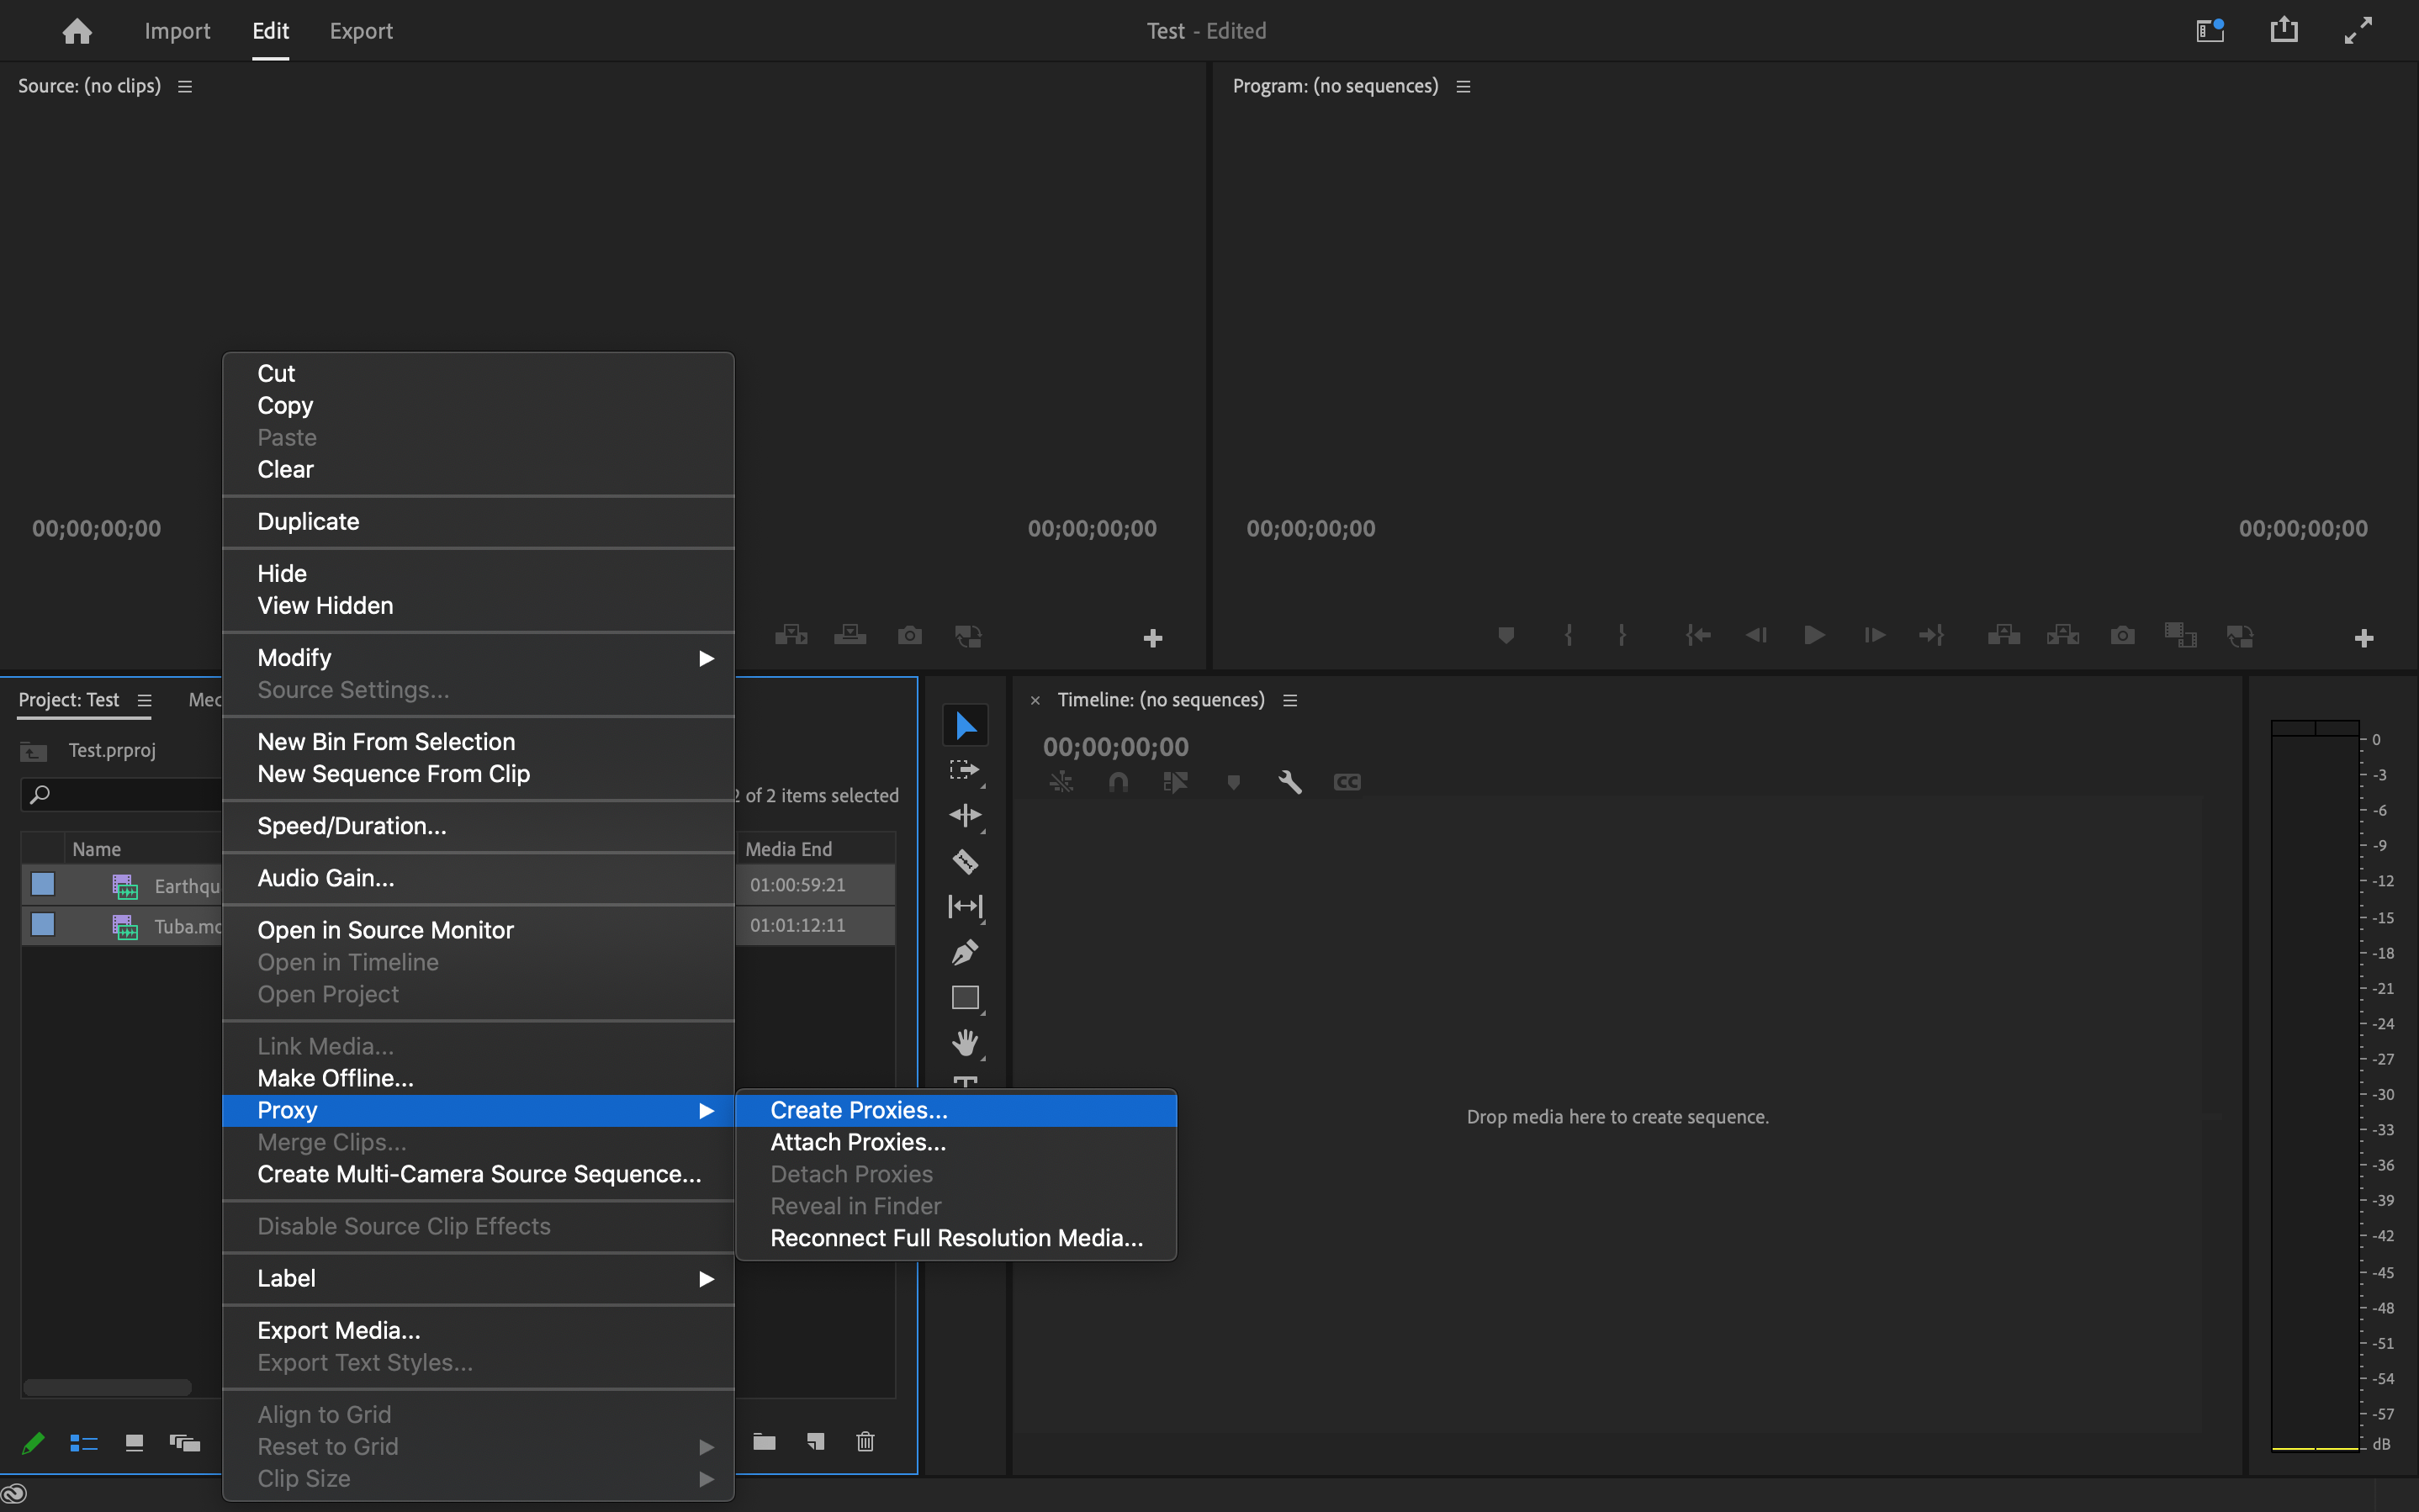
- You’ll notice the ingest preset you just created above is not available. You need to ADD it first. Press the “Add Ingest Preset” button and navigate to the preset .epr file on your computer.
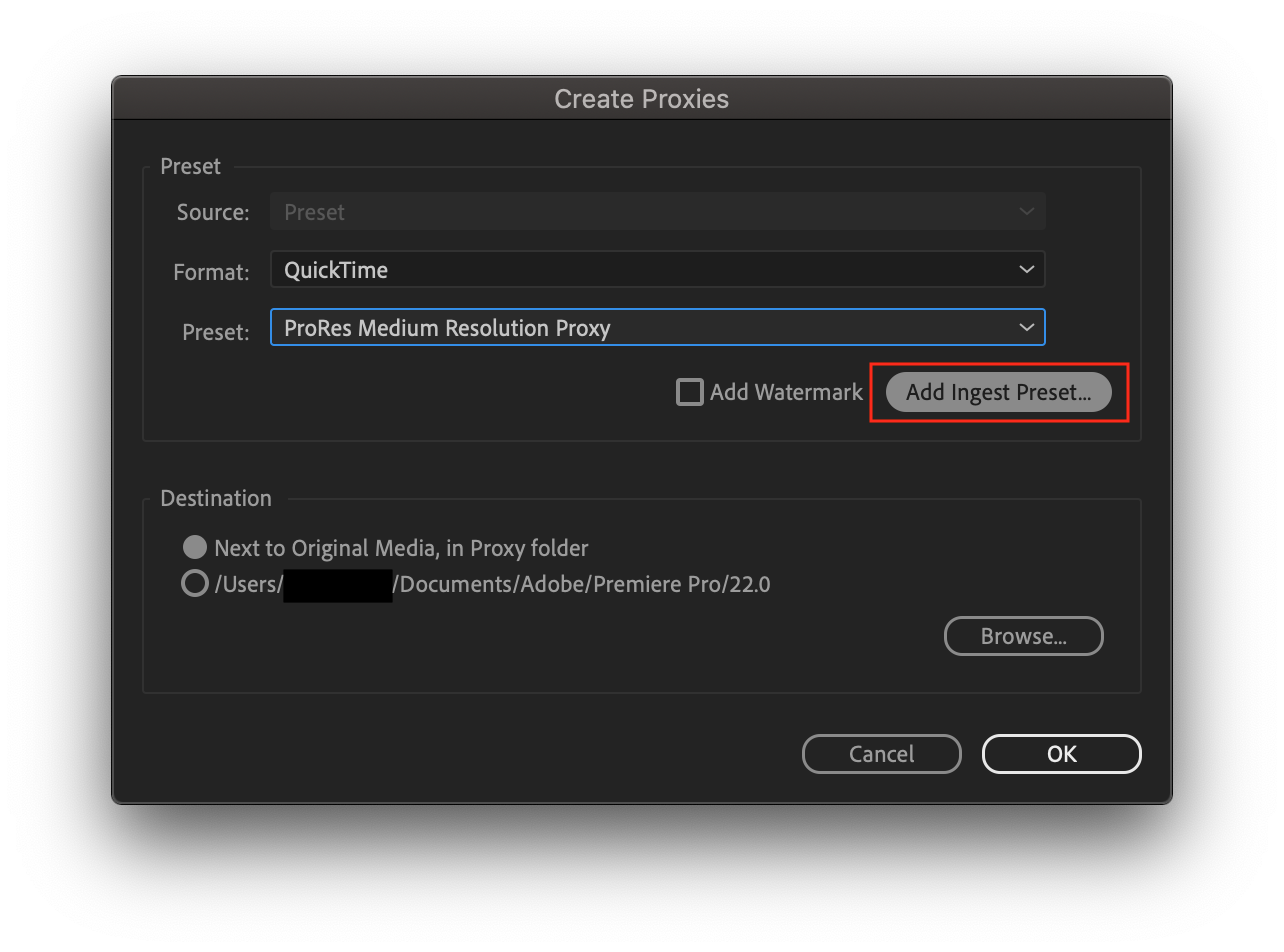
- Select it, select your proxy destination, and press OK.
- Your files should now be transcoding in Media Encoder in the background, typically one at a time to a destination you’ve pre-determined, either internal or external storage. These transcodes will use your computer’s processing power while running.
Confused yet?
If you’re an experienced Premiere Pro editor, you’ve probably done this many times before. You probably know what settings are needed for each codec and what resolution you will receive.
However, if you’re not as experienced, you’ll lose valuable editing time figuring out what to do when issues arise.
Finally, when you transcode while collaborating remotely, the other party doesn’t usually have access to your proxy files unless you upload them over the web or ship a hard drive over.
Evolphin Zoom solves this problem by making collaboration easy. Let’s look at the same workflow in Evolphin Zoom:
Step1: Ingest your camera files via Check-In from your third-party mount point into Zoom.
Step 2: Wait a little while, then download your proxy files wherever you’re editing.
That’s it. Media managed!
Zoom has built-in presets for each codec uploaded. Upon successful ingestion, each file is automatically triggered to transcode to a high-quality proxy file in the original file’s native resolution (or frame size) and color space.
With all this happening in the cloud, multiple clips are transcoded rapidly and simultaneously, making them quickly available to editors. Your machine also loses no processing power from transcodes happening locally in Media Encoder.
As Evolphin Zoom can read essentially every type of camera file, there’s no difference between one user’s proxy files and another. Each editor can collaborate and use the same files with no difference between what they see on their monitors.
Proxy and Camera File Sizes and Locations
Choosing where your proxy files transcode to can often cause several issues. Your native files at full resolution probably live on a high-speed hard drive (external or internal), a RAID, or a fiber-connected SAN. Organization is key, and when you’re under time constraints, sometimes organization is the first thing that gets affected.
If someone in New York has 4TB of camera files and you’re editing in Los Angeles, one option is to ship them via hard drive. This is a great option if the files are all on one drive. If not, things can get messy quickly.
You may have Day 1 and 2 or one drive, then another drive daisy chained with part of Day 3 and part of Day 5, then another with Day 4 and the other parts of Days 3 and 5, and so on. Confused again? Me too.
With Evolphin Zoom, all of the camera files are in the cloud and accessible to anyone anywhere there is an internet connection. Plus they’re secure.
If a drive in your daisy chain suddenly decides to shut down permanently, or that third cup of coffee spills and fries your RAID, you’re back at square one. Now you’re asking for a delivery of camera files again and transcoding proxy files afresh. Evolphin Zoom prevents this disaster by keeping all your files safe and sound.
As for storage, making your proxy files before shipment could lower the amount of storage you need from 7TB of camera files to 1TB or less for the proxy files.
In this case, you’ll only need 1TB of free storage space. That’s much cheaper when it comes to cost – and if it’s being sent over the internet, much less time to download.
However, this 1TB of free space may be spread over several drives, depending on what you have available to you.
So now you have proxies on a few drives. You navigate to some of them and accidentally move a file, or quickly add new media here and, boom, media is offline and misplaced. You’ve just lost some editing time searching for something you just had online.
Again, Evolphin Zoom prevents this. When Zoom downloads proxy files, it does so in a specific path that stays the same on each drive and for each editor. Your pathway will never change, so misplacing media is a thing of the past.
Even if a project comes back months or even years down the road, the pathway stays the same. Nothing changes in the cloud in the interim, and redownloading and relinking is quick and easy.
Switching Between LowRes Proxies and Native Files
You’ve probably spent days, weeks and months working on your project and you know this like the back of your hand.
But the downside is, you’ve spent all this time working on your project, and your eyes aren’t so fresh. It’s time for your final export. You’ve crossed your t’s and dotted your i’s, right? Has your co-editor done the same?
The Toggle Proxy button in Premiere Pro quickly lets you switch between your proxy file and high-resolution file. If it’s blue, you’re viewing the proxy file. If it’s white, you’re viewing the high-resolution file.
But what if you go through and make a change to one file in proxy mode and forget to toggle it back to high resolution? What if a collaborator forgot to make that change and it’s now your job to export the final file?
If you have a “just right” proxy file, you might get away with it, depending on your export’s destination.
If you’re exporting for theatrical or streaming, it’ll stick out like a sore thumb. If you’re exporting for the web or YouTube and that clip is critical, you might want to redo it.
Finally, if it’s being compressed even further for an internal video or website, well, you might have to make a judgment call. But making that call isn’t really a place you want to be.
The problem with having a great looking proxy file is that a situation like this is more likely to occur, so you need a quick, easy fix.
With Evolphin Zoom and its integrated Adobe plugin, you can quickly see which files are connected to camera files (high res) and which ones are connected to proxy files (low res).
Simply click Browse in the top bar, then Linked Files. From here you can immediately see which files are connected to both resolutions.
Either you or a collaborator can quickly find the proxy clip and with the press of the “high res” button, the high resolution file will be back online. Need to make another quick change? Press “low res” and your back editing with the proxy.
Export Complete
Some of us edit with HD monitors, some of us have 4K monitors. However some may need to be mobile or have economic reasons to use laptops.
Regardless of how you edit, the visual aspects of a well transcoded proxy file can sometimes be indistinguishable from the high resolution file in the small viewers in Adobe Premiere Pro.
Having a tool like Evolphin Zoom on your side is safer for your finish, and more satisfying.
Time to take the dog out.